Infill Patterns in 3D Printing: Strength, Weight and Print Time
Infill is an important part of FDM 3D printing. It affects the strength, weight, material consumption, and printing
time of a finished part. Choosing the right 3D printing infill pattern can help manufacturers achieve a better
balance between product performance and production efficiency.
But which infill pattern is best for strength? Is Gyroid better than Grid? And does higher infill density always
mean a stronger part?
Let's take a closer look at the most common 3D printing infill patterns and how to choose the right one for
different applications.
1. What Is Infill in 3D Printing?
Infill refers to the internal structure inside a 3D-printed part. It fills the space between the outer walls and
supports the top layers.
In FDM 3D printing, infill helps:
Improve internal support and part stiffness.
Control the weight of the finished product.
Reduce material consumption compared with solid printing.
Influence overall print time and production cost.
What it does badly is rescue a part with thin walls or a load that crosses the layer direction. A bending load
is carried mostly by the walls, because the walls sit farthest from the middle of the section, where the stress
is highest.
That is why the best infill pattern depends on the part rather than on a ranking of patterns. A pattern is good
or bad only against a load case.
2. Density and Pattern Are Two Decisions
Infill density is how much material goes inside, as a percentage of that internal volume. Pattern is how the
material that does go inside is arranged.
The infill percentage and the pattern are two settings, not one, and they behave very differently. Changing
density changes mass and print time almost in step with the number. Changing pattern moves the same
plastic onto different roads, so the mass barely moves while the direction of support changes.
Two parts at the same percentage can therefore weigh nearly the same and fail in different places.
3. Common 3D Printing Infill Patterns
Different infill patterns have different advantages. Here are six commonly used options.
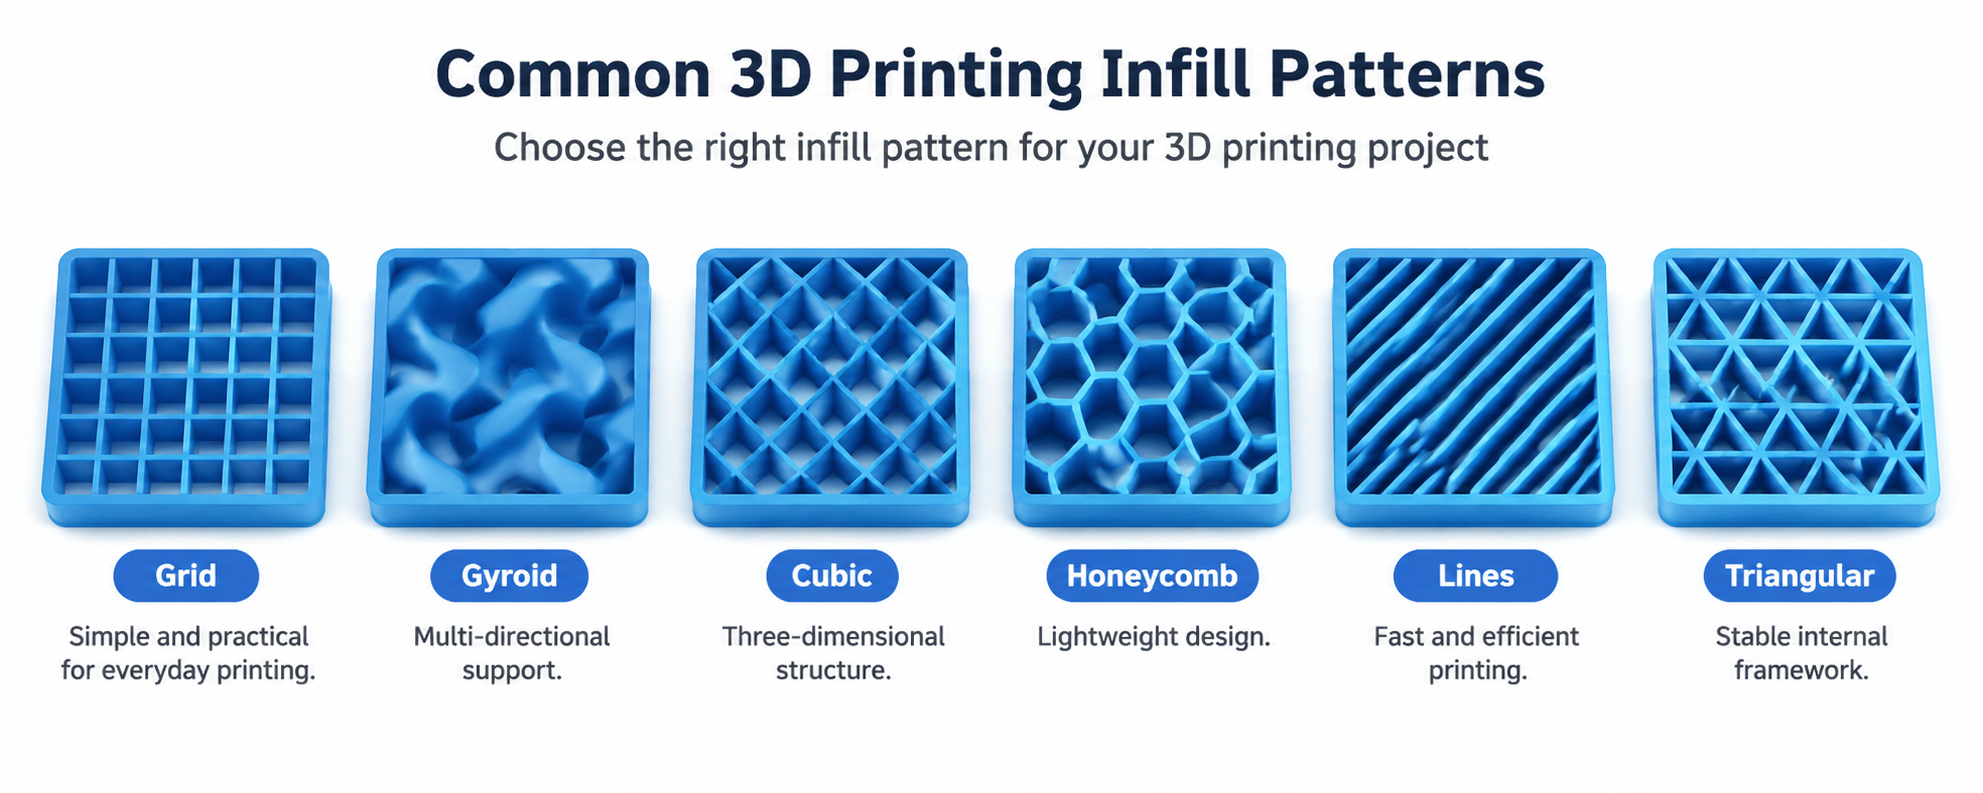
| Pattern | How the roads run | Strong at | Watch for |
| Lines | One direction per layer, alternating | Fastest to print, clean top | Weak across the lines |
| Grid | Two directions crossing in each layer | Cheap stiffness on both flat axes | Material doubles at crossings, nozzle drag |
| Triangles | Three directions in each layer | Stiffness in the flat plane, smallest gaps | Longest path, most crossings |
| Honeycomb | Hexagonal cells | Compression and Lightweight structure | Directional, slower to lay |
| Gyroid | Continuous wave repeating in three axes | Balanced support from any direction | Complex path, vibration at speed |
| Cubic | Corner-down cubes repeating in three axes | Load from three axes in straight lines | Crossings inside a layer |
There is no universally strongest infill pattern. Actual performance depends on infill density, wall thickness,
material, print orientation, and loading conditions.
4. How Does Infill Density Affect Strength and Weight?
Infill density describes how much internal space is occupied by the infill structure. A higher percentage generally
means more material inside the part.
Common density ranges include:
5%–15%: Suitable for decorative models and lightweight prototypes.
15%–40%: A practical starting range for many functional prototypes.
40%–70%: Worth considering for parts requiring additional stiffness and internal support.
70%–100%: Used when substantial internal support or a nearly solid structure is needed.
Increasing infill density generally increases material consumption and can extend print time. However, higher infill
does not always mean better strength.
For many FDM applications, increasing wall thickness or optimizing print orientation may improve mechanical
performance more effectively than simply adding infill.
5. How to Choose the Best Infill Pattern?
The best infill pattern depends on the part's purpose.
| Application | Suggested Pattern |
| Decorative models | Lines or Grid |
| General prototypes | Grid |
| Functional parts | Gyroid or Cubic |
| Lightweight components | Honeycomb or Gyroid |
| Structural prototypes | Triangular or Cubic |
| Large industrial parts | Gyroid, Grid, or Cubic |
These are general recommendations, not fixed rules. For critical components, testing under actual working
conditions is always recommended.
6. How to Improve Strength Without Increasing Infill?
Increasing infill is not the only way to make 3D printed parts stronger. Several other settings can also make a
difference:
Increase wall thickness: More outer walls can improve the strength of many FDM parts.
Optimize print orientation: Layer direction affects how the part handles different loads.
Choose the right material: PLA, PETG, ABS, and ASA have different mechanical and thermal properties.
Improve layer bonding: Proper nozzle temperature and cooling help improve adhesion between layers.
Optimize part design: Adding ribs and rounded corners can improve structural performance.
Combining these factors with the right infill pattern can help produce stronger parts without unnecessary material
consumption.
7. Conclusion
Choosing the best 3D printing infill pattern is about finding the right balance between strength, weight, material
consumption, and print time.
Grid is a practical choice for general-purpose printing. Gyroid and Cubic are worth considering for functional parts,
while Honeycomb can be useful for lightweight structures. Lines is a simple option when printing efficiency is a priority.
For the best results, consider infill pattern, density, wall thickness, material, and print orientation together.
Frequently Asked Questions (FAQ)
1. What is the strongest infill pattern in 3D printing?
Gyroid and Cubic are popular options for multi-directional internal support. However, the strongest choice depends
on part design, material, and loading conditions.
2. Is Gyroid better than Grid infill?
Gyroid provides a continuous three-dimensional structure, while Grid uses intersecting straight lines. Gyroid can
be useful for functional parts, while Grid works well for general-purpose printing.
3. What is a good infill density for 3D printing?
A density of 15%–40% can be a practical starting point for many functional prototypes. The ideal setting depends
on the part's strength requirements and design.
4. Does higher infill density increase print time?
Generally, yes. Higher infill density requires more material and additional printing movements, which can increase
production time.
5. Is 100% infill necessary for strong 3D prints?
No. Wall thickness, material selection, print orientation, and layer bonding also have a major influence on part strength.