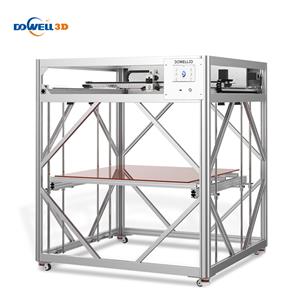
Holes and gaps on the corners of the bottom surface during 3D printing of 3D printer industrial
Insufficient number of edges. Adding more contour edges to the print will significantly enhance its load-bearing foundation. Because the inside of the print is usually partially hollow, the outer wall is thin and thick, which will have a great impact. There is a wall thickness setting in the basic setting. The wall thickness setting is generally a multiple of the nozzle. For example, if your nozzle is 0.4 mm, the wall thickness is generally set between 0.8 mm and 1.6 mm. If you set it at the beginning The thickness is 0.8mm, but the printed model has holes on the outer wall, then you can appropriately increase one or two layers of wall thickness to improve it. The appropriate wall thickness is generally 1.2mm, so that it will not take too long to print The model that comes out will not have holes.
The top solid layer is insufficient. Another common reason for a weak foundation is that your printing has insufficient solid filling layers on the top layer. The upper wall is too thin to fully support the structure punched on it. To modify this setting, you can set it in Basic-Fill-Bottom/Top Thickness. If the default thickness is 0.8mm but there are still holes when printed, then you can set the bottom/top thickness to 1.0mm-1. 2mm, this can make the top and bottom layers stronger.
The fill rate is too low. The last setting you need to check is the fill rate, which is controlled by a slider under "Slice Settings" or under the "Fill" tab. The top solid layer is constructed on top of the top filling, so enough filling is needed to support these layers. For example, if you set the fill rate to 20% before, try increasing it to 40% to see if the print quality has improved.
How to solve Metal 3D printers printing top surface scars
The advantage of large format 3D printing is that each print is constructed one layer at a time. This means that each layer is independent, and the nozzle can freely move to any position on the platform, while the print is still being constructed below. You may see that when the nozzle moves on the surface of the previous layer, it will leave a trace, which is easiest to see on the upper surface of the print. This kind of scar is produced when the nozzle moves to a new position. Below we will explore these possible causes, and provide corresponding suggestions, which settings to adjust to avoid the problem from recurring.
Extruding too much plastic: The first thing you need to make sure is that your extruder does not extrude too much consumables. If you extrude too much consumables, each layer will tend to be thicker than preset. This means that as the nozzle moves through each layer, it may drag consumables that were previously over-extruded. Before you check other settings, you need to make sure you have not squeezed too much consumables.
Vertical lift (Z lift): If you are sure that the amount of consumables extruded by the extruder is appropriate, but you still encounter the problem of the nozzle dragging on the upper surface, then you need to look at the vertical lift setting in CURA. Enabling this option will cause the nozzle to lift a certain distance before moving on the previous printing layer. When it reaches the target position, the nozzle will move back to its original height for printing. By moving up to a certain height, the nozzle can avoid scratching the upper surface of the print. To turn on this function, click Tools-Open Expert Settings-there is a "Z-axis lift height when retreating" in the consumables retreat, generally set to about 0.5mm. For example, if you enter 0.5mm, the nozzle will lift 0.5mm before moving to a new position. Please note that the uplift will only occur during the retraction action.